
Thursday, December 26, 2013
Thursday, December 12, 2013
A Riveting Tale of Fermenting Smelly Crap in a Crock.
OK, so I'm thinking that my title is just a little bit harsh!
*Sigh* I'm either just pissy or hormonal tonight, or perhaps *technically* a little of both.
But No Worries!
Chin up!
This beautiful glass of wine should help me clear my head and brighten things up!
(Or at least until I drunk vomit all over my keyboard! lol)

Wait a minute...
Wasn't this supposed to be a story about making Sauerkraut???
PERHAPS?
Well then,
Let's get on with it!
"Alex, I'll take; Foods you Eat that smell like ass, for $200.00 please?"
(See? The wine is already working!)
Once upon a time, (and with a $1.50 in my pocket) I got a wild hair up my backside and decided to buy a larger than life, green cabbage from a local farm stand. Besides being super affordable and very nutritious, I actually LIKE cabbage!
With that, I stuck my $1.50 into the money slot at the self service food stand, and went home with a cabbage head larger than a nine month pregnant woman's belly.
I was a happy girl!
SO happy that in fact, I did what every devoted cabbage lover does....
SO happy that in fact, I did what every devoted cabbage lover does....
I let it sit on my counter for over a week because I was too lazy to deal with it! lol!
Once my shroud of laziness subsided, I had decided that I had wanted to make Sauerkraut out of this cabbage. I had never done this before, but the internet told me that it is actually quite easy. Kind of a "set it, and forget it" concept.
(watch.. I will now get sued because I just used a popular infomercials tag line!)
When the day came to start my endeavor, I decided to weigh the cabbage first;
.jpg)
Here's an idea of just how BIG this cabbage was! Even after open air drying on my counter top for over a week, it STILL weighed 15 lbs! That's just crazy!!
First off, I had to chop this up.
What a major P.I.T.A it was!! It was like trying to hack into a bowling ball using nothing but spoon to cut with!
.jpg)
Because of the fact that I am no cabbage professional, I used the most primitive tool for the job. A simple serrated steak knife. Most people would use a Mandolin (what's a mandolin? lol!)
Thank GOD that the cabbage wanted to spring open when I tried to cut it in half, or else I would have never gotten it apart!
I started out by cutting wedges off, then I would cut those wedges into small shards. I took those shards and put them in a bowl on my scale. When I got 2 lbs of shreds, I added fine sea salt to it (can't remember how much salt - forgot!)
Oh yeah! NOTE the 7 lb purple cabbage next to it!
Glutton for punishment! I canned purple sweet / sour cabbage after this project!
When I had 2 lbs of salted, shredded cabbage, I started adding them to this fancy, shmancy, 4 gallon crock.
(Shmancy??? REALLY? lol!)
(Shmancy??? REALLY? lol!)
.jpg)
I borrowed this huge beauty from my dad!
LOVE IT!
LOVE IT!
Great that it didn't leak, suck that it didn't have a lid. (I'll get more into that in a bit)
I took the salted cabbage and put it inside the crock. Did I mention I bought ANOTHER green cabbage to add to it?
23 lbs of cut cabbage, and a small finger cut later...
I finished filling that huge crock!
I added large outer leaves to cover my handiwork.
.jpg)
Because I didn't have an actual lid, I had to come up with an idea to cover it. I was supposed to not let air get inside (yeah right...lol!) so I used an inverted glass salad bowl.
As the final Crem De La Crem,
I needed someplace to put this masterpiece for the next TWO months. This was tough! Being the end of October, I couldn't put it outside because it would freeze. I don't have a basement. And no way was I going to have my living room smell like a dead carcass for the next few months.
Do you want to know where I put this???
You're going to die when you hear this...
I can't believe I'm actually ADMITTING this...
Cabbage...It smells.
It smells like poop.
So I put it where the magic happens.
I put it in the BATHROOM!
(Ok, go ahead and pick yourself off the floor now.)
If you think about it, it makes LOGICAL sense!
(...Meanwhile, refilled my wine.
-Just thought you'd like to know!)
Besides, doesn't everybody put their edible food in the shitter?
For the past 3 minutes I just played a game with Google called; "What's a good synonym for Shitter?"
Anyway,
Throughout this entire process I learned ONE major thing.
I am not very good at making Sauerkraut!
Every so often I pulled off my makeshift lid (the soup bowl) and checked to see what was happening. The outer leaves that covered the top were starting to mold. From what I had read, I learned that this was "ok". I confirmed that when I peeled back those larger outer leaves to look at the shred. Underneath, the cabbage was a beautiful off white color. But as time went by, I did start to worry. I noticed that the top layer of shred was starting to mold. I discarded that layer, and made a salt water brine to fill more of the crock (keeping the shred submerged) And that's kind of how life went, time would go by, I'd check it, I'd scrape off the scum.
I wasn't quite sure when to call this science project from Hell done.
It looked like Sauerkraut. It smelled like Sauerkraut, but it took me a LONG time to get up enough guts to try it!
There's just something about eating rotting food that plays on your psyche!
!!*PUKE*!!
I DID try it, and I was pleasantly surprised at how much it DID taste like the real thing!
(New experience for me!)
-Then of course I waited to see if I was going to die from Botulism or something silly!
With all systems a go, I decided to put this concoction into jars!
Then it got kinda weird...
.jpg)
I had to scrape off a lot of undesirable "stuff"
.jpg)
This was the first layer.
Completely black and mushy.
NASTY!
.jpg)
Second layer.
Not black, but super slimy!
Pitched this in the trash too!
.jpg)
3rd layer.
A little firmer, but trash.
Getting closer...
.jpg)
Finally!!
Reached something edible!!
White and crisp!
If I ever decided to do this again, (which I'm completely on the fence about!) I would change one thing. I would have a lid that sealed tight and didn't let in oxygen! HUGELY important!
Air = mold production. I would also add some type of weight to the top of the cabbage to keep it submerged in the brine.
Overall, it was an interesting learning experience!
Another notch in the "Been there, done that!" belt.
Another notch in the "Been there, done that!" belt.
I'm REALLY not quite sure if I'd ever want to do this again though! lol!
In the end, you know what would be GREAT???
Being sober enough to proof read this.... ;)

Friday, November 1, 2013
This Halloween "I'm Hooked" on make-up!
"Since you are so into Halloween"...
This is a phrase most commonly said to me when it comes to my yearly Halloween costumes. I usually respond with a bright smile and really not a whole lot else, because frankly, I just don't know what to say!
This year though, I actually took the time to think about it.
Am I *really* that into Halloween? Why DO I dress up?
Do I do it for attention?
I've dressed up in costume on Halloween almost every year of my life.
Some costumes of mine are great, some are just "OK", but all share a similar theme; they are creative. I admit, I'm not a very original person, I tend to pull ideas from things I've seen before. But I take those simple ideas, and turn them into something more. Like the time I dressed up as a simple Fairy. Instead of just the wings and the dress, I decided to cover myself from head to toe in glitter. LOTS of glitter. Enough glitter to make Edward Cullin in the sunlight look like child's play. I had SO much glitter on that night, I probably sparkled in the dark! Or there was the time I dressed as a simple scarecrow, I decided to wire a 20" tall crow to the top of my head! One of my costumes even had a real working, 13 loop, heavy rope, hangman's noose that I had made incorporated into it! Not to mention you'all saw my Medusa costume! I could go on and on...
To me, dressing in costume is fun!
First, as a side note, I must set the record straight! I only dress up for the Halloween season (and a 5k once!). I am NOT into the "Adult" version of "dress up". Anyway, I like costumes because it's a way to change people's perception of reality. (That's probably why I'm so good with Make-Up!) It's a chance to play on folly, or to strike a nerve on someone's irrational fear.
Next I thought about the attention aspect of it. Do I do it for attention? I would have to say that 20% of me does it for the "Look at me!" type of attention. If I didn't say that, i'd be lying. Because I don't dress up in costume just to sit alone in the house, then later take it all off! I know it's not a higher percentage based on the fact that I am truly shy. Though most would never suspect, I get very uncomfortable being the center of any kind of attention. Because of that, I never choose costumes that require "acting".
I dance to the beat of my own drum and like to stand out in a non standing out kind of way!
(cause that made absolutely NO sense! lol!)
The remaining 80% of the attention aspect comes from "Look what I've accomplished". I like the challenge of costumes. I'm always trying to outdo what I've done before. I live for the challenge of trying to take what's in my head, and to then make it a reality. (and if you've spent any time inside my head- you would realize how challenging that truly is!!) Even though I have good intentions on starting my costumes far enough in advance, I find that I do the best work (and have the best costumes!) on the ones that I put together in a very short period of time. I proved that theory the year I made Insane Asylum Escapees costumes. I spent the day of, sewing & assembling straight jackets, finishing with just enough time to do make-up, to end the night by taking first place in a costume contest. I LOVE to do my costumes on the cheap! Making what I can, trying to think outside of the box using stuff that wouldn't necessarily be meant for that use.
So in conclusion, am I really THAT into the Halloween holiday?
My answer would have to be; No! Not at all!
- It's so much more
-------------------------------------------------------------------
(OK, that was kinda winded. I better get on with this Fish Hook "How To"!...)
Easy to apply, & Inexpensive
FISH HOOK MAKE UP
Total application time, less than 1 hour.
Start with:

A couple fishing lures.
Use wire cutters to cut off all barb (hook) points, leaving as much hook on as you can without getting yourself impaled if someone bumps into you!
Small container of Liquid Latex.
Toilet Paper
Ladies Foundation that matches your skin tone
"Witch" Creme Color Make-up
aka: Deep purple, Dark Red, Sage Green, Mustard Yellow
Coagulated Blood
Cheap Paint Brush
A Brown or Black Eyeliner Pencil
And if you are a female that wears make-up, your normal everyday make-up.
NEXT
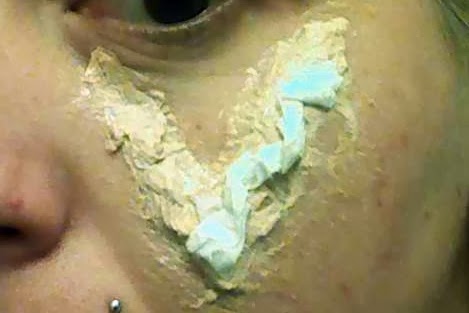
Decide where on face you want your skin flapped. Clean that area with facial astringent. Take paint brush and dip into liquid latex. Paint the part of face you want to look like skin that's been skinned back. (I used a "V" shape) Rip off small sheets of toilet paper (single ply). Rip those to size of painted strip. Crumple, stick onto wet Liquid Latex. Dip paint brush in L.L, paint over newly applied toilet paper. Put on more paper... repeat until you have your desired effect. When finished, give final coat with L.L and let dry.
Oh yeah! And DUH, don't get it in your eyes! If you do that, you're on your own! No clue what to tell you to get out of that jam!
As you are building, it will look similar to this:
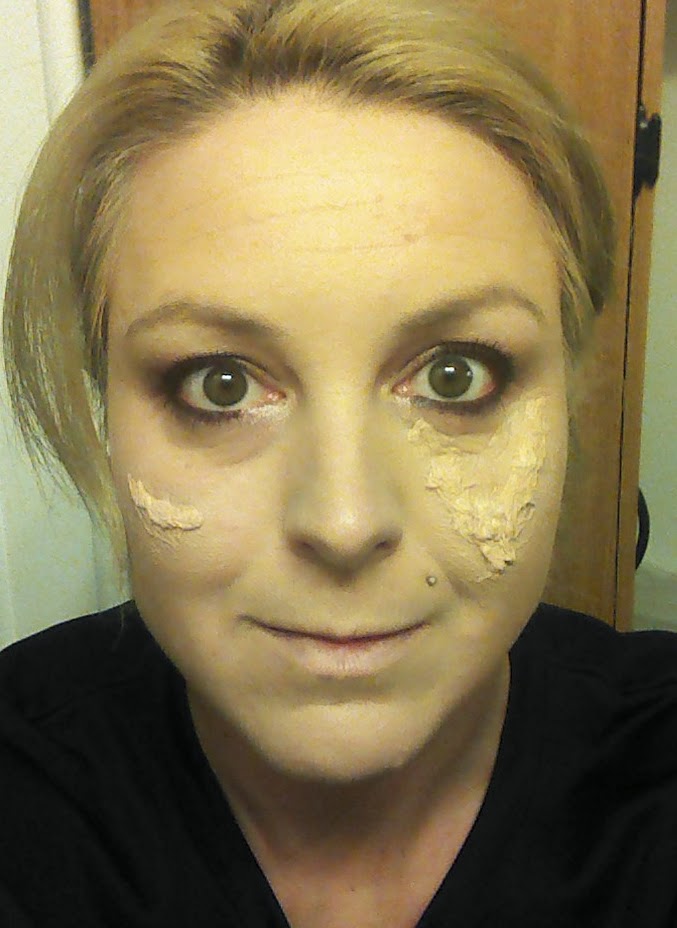
Mine looked like this when done. Yours will look like your own creation!

Next check the placement to make sure you are on the right path for effect.
Lightly balance fish hook off of dried L.L (I'm already sick of writing "liquid latex") If good so far, remove lure.

When you got it where you want it, apply L.L and a single sheet of paper in middle of triangle by eye. This will give the skin a more "raw" texture when the make-up is on. After dry, blend L.L with skin tone matching Ladies foundation. Use eyeliner pencil to color the water line on bottom lid -of the eye with the "V" (and if you're a dude, don't poke yourself in the eye!) If you are a make-up wearer, apply the rest of your make-up as normal. I chose to add a little white in my base make-up to give me a more pale look.
NEXT
Apply dark purple creme make-up as shown below.
TIP: Wash/dry the brush you just used for the L.L and use it to apply the color (from here on out). SUPER TIP: Use the back of your off hand as a make-up palette. In other words; dip brush in make-up, wipe make-up on back of hand. Use that make-up to apply to face. It eliminates gobbing your make-up on, and is a great place to mix colors!

To give it a more "real" effect, vary how much color you put on in certain spots. Next, take the eye liner pencil and color a small spot onto the back of your hand (palette) and mix a little of some other color (doesn't matter) to not make it SO black. Wipe brush dry by using some toilet paper that you have kicking around - cause I'm sure if you're like me, you have one Hell of a mess going on -so there will be lots of it! Use dry brush to apply just a little of that black"ish" color softly under the fake flapped skin pieces (as shading to give depth)

NEXT
Apply dark red creme make-up over purple and up around eye. Here's an important tip: DON'T cover the purple completely! Leave some areas showing to give it depth. Oh! And if you don't want your make-up to SUCK, spend the time to take your time! Blend! Blend! Blend! You can take the cheapest clown make-up and make it look great just by improving your blending skills. NO hard edges! :)

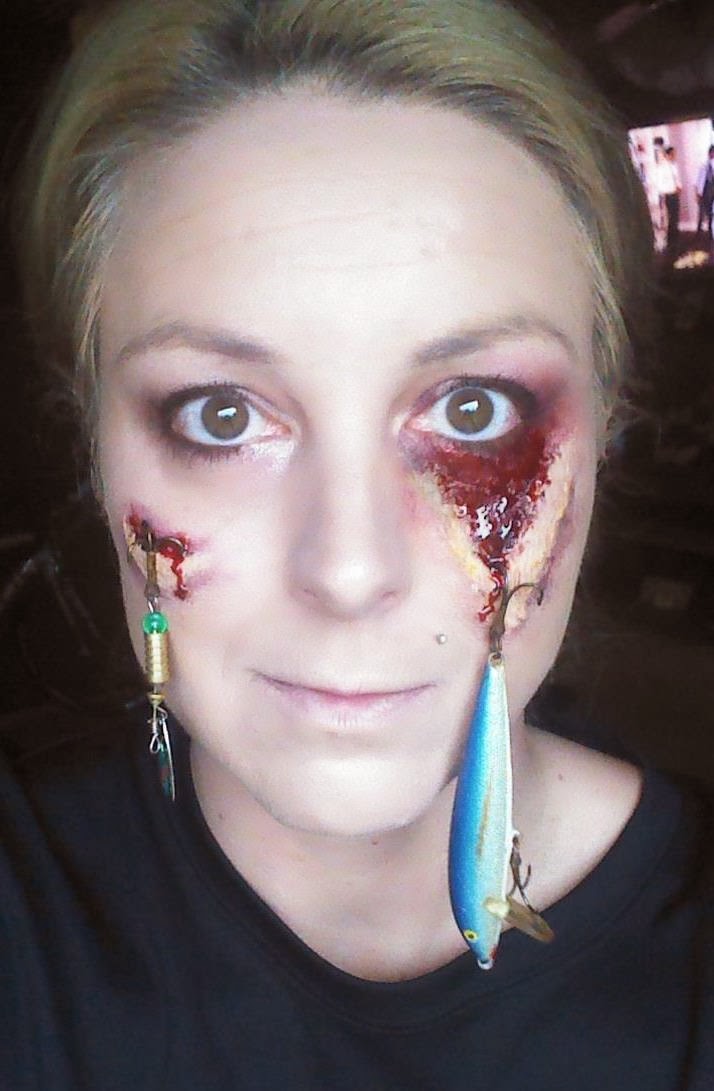
Next I carefully balanced the Fish Hook on to see if I liked where this was going.
I also highlighted the flapped skin with a bit of that mustard yellow. Even though the color didn't match my skin per say, it helped make the pieces "pop" Plus it gave that skin a not "alive" but yet not "dead" look too. I also added some yellow to the corner (by nose) to my bad eye to make it look more 3 dimensional.

LASTLY
If all is right with the world, and you feel it is close to being finished, carefully poke fishing lures down through the edge of your latex and nestle the hook between skin and prosthetic. Even though they dangle, they won't fall out. As a final touch, carefully open the coagulated blood. Use the non brush end of your paint brush and dip the stick tip in the blood. This stuff is beyond sticky so watch out!! Carefully dab C.Blood onto the the red areas. Don't go above your lower eyelid. I don't think it would hurt you- it would just feel NASTY sticky! How much blood is a personal preference. TIP: Coagulated blood holds really well and doesn't run. It just starts to look dull after 4 hours, losing it's wet look. Save this step for the very end, or if need be, carry it along for touch up.
As for the rest of the costume?
The obvious idea would be to dress up as a Fisherman.
Now take that idea one step further (and increase your chances of being best costume!) by tying the line from a fishing pole onto one of the lures, and carrying around the attached pole all night.
THAT would be COOL!
Or if you are the FUN type,
Stop into your local sporting goods store and visit the fishing department. Tell them that you tried your hand at fishing, but it just wasn't working out all that well for you!
As for me?
I did the "I'm Hooked!" Make-up for nothing more than to take my boy outside Trick or Treating. Unfortunately, in my part of the world it was raining pretty solid that night, so I just chucked on my Fedora and a Rain Jacket.
Either way,
I still ROCKED it!

Good Make-up trumps anything.
...and in the end,
REMOVAL

Wash face with soap & H20, carefully peel off latex.
It sticks like a mother to her offspring - so be careful and go SLOW!
Clean-up is quick, but not necessarily pain free!
Wednesday, October 30, 2013
Heather's Story
"Courage doesn't always roar,
sometimes it’s the quiet voice at the end of the day whispering
‘I will try again tomorrow"
‘I will try again tomorrow"
– Mary Anne Radmacher
For those of you that know me, or have come to know me through this blog, you know that I am strong on Female Empowerment. You can clearly see it buried within each blog entry I write; from the things I've done throughout my life, to the things I've built, and the challenges I've faced.
I believe in the strength a woman possesses in order to rise above all that life gives.
We, as women are expected to carry the weight of the World, and to never put it down.
I believe in the strength a woman possesses in order to rise above all that life gives.
We, as women are expected to carry the weight of the World, and to never put it down.
Just recently I was contacted by a strong woman who is fighting her own battle that is bigger than anything that I could ever imagine.
She asked for nothing more than for me to share her personal message with my readers. Even though she was a complete stranger to me, I am truly inspired by her story, and the courage it took for her to reach out to me personally.
She asked for nothing more than for me to share her personal message with my readers. Even though she was a complete stranger to me, I am truly inspired by her story, and the courage it took for her to reach out to me personally.
To help spread her message, please share her web link (below) on your own media site.
Life is about giving, even if it's just awareness.
But even awareness can help save a life.
But even awareness can help save a life.
Heather has Mesothelioma.
"Mesothelio... WHAT?"
Mesothelioma is a very rare form of cancer primarily caused by the exposure to Asbestos. Mesothelioma attacks the lining that covers your internal organs. If you have ever had a severe cold and have coughed so hard that your chest hurts each time you breathe- You had more than likely bruised your Plural space (that is the lining between your lungs and your rib cage) Now imagine that pain x's infinity, and in more spots, and if it didn't go away.
Now imagine what Heather went through.
Now imagine what Heather went through.
What exactly is Asbestos?

(asbestos in its natural form)
Asbestos is a strong, heat resistant fiber that occurs naturally in mineral form. It became a primary building material used in the 19th century because of its tensile strength, flame retardant ability, and of course because it was cheap.
It was basically the wonder product of its time, and it was used in EVERYTHING!
What's so harmful about it?
The main problem with Asbestos is that the fibers are so small. 700 times smaller than a human hair! Once airborne, they are easily inhaled. Those tiny fibers can even get lodged in your skin! Once in the body, Asbestos causes all types of problems, including Heather's Mesothelioma.
The first documented death from Asbestos occurred in 1906 in the UK.
But unfortunately, it wasn't until the 1970's and 80's that our own government started cracking down on the use of this product.
How prevalent is Asbestos today?
Outside of the fact that construction workers, and ship builders still face Asbestos from old construction, products today can still be manufactured with Asbestos as long as they contain less than 1%. Some current uses include; brake pads, clutch systems in cars, roofing material, home insulation and even some potting soils!
Please take a moment to watch this short video.
You will soon learn what a courageous, strong woman Heather is!
If you would like more information on Mesothelioma please visit:
Tuesday, October 29, 2013
The Making of Medusa
Medusa? Isn't that the snake head lady??
For those of you that have been out of English class for way too long, or never paid attention in the first place! Let me give you a quickie synopsis to refresh your memory of who she was...
"Medusa" as you know, is from Greek Mythology.
Once upon a time Medusa was so strikingly beautiful that men found her irresistible. She did the "nasty" (willingly or unwillingly - depending on what version you read) with the God of the Sea, Poseiden, while in Athena's castle. The Goddess Athena was so outraged by this act (and she herself was jealous of Medusa's beauty) that she transformed Medusa's long, beautiful, hair into serpents, and turned her face so ugly that one look would turn onlookers into stone.
Her death came from a beheading by Perseus (who was sent on a mission by a King) who used the reflection from a shield that was given to him by the Goddess Athena (go figure) to look at Medusa without turning into stone himself.
When Perseus beheaded her, a winged horse (Pegasus), and a golden, sword wheeling giant, sprang from her body. Her head was then placed in a sack and was used by Perseus to turn his would be attackers into stone.
I would like to tell you that I have some passionate attraction to this mythological character, or that her life is some type of symbolism or metaphor for my own, but in all honesty it's neither, I just thought it would be "Cool".
Medusa really wasn't my first choice for Halloween this year, this was:

Yup, that's Regan from the iconic 1973 horror movie "The Exhorcist".
I didn't see this movie until almost 15 years after its release (I was just a baby)- but when I did, I was scared to death! She was creepy stuff!
I didn't see this movie until almost 15 years after its release (I was just a baby)- but when I did, I was scared to death! She was creepy stuff!
I was dead set on being Regan this year. I chose her because I wanted to do a frightening costume, and it's been a few years since I've been a scary figure. To help refresh my memory of her, I watched videos on her make-up and her character and had all of my supplies in waiting. But at the last minute, I decided not to go with that.
What changed my mind? (Besides the fact that I'm an indecisive female???)
4 days before Adult Halloween I started thinking... I was worried that because she is SO iconic that if I missed just one mark on my make-up that it would be no different than listening to an American Idol contestant sing a Whitney Houston song out of tune. I would fail.
Not to mention, outside of her gory make-up, and the legend that she is -She is a little PLAIN.
I wanted something MORE. (Would you expect anything less from me? lol!)
I wanted something MORE. (Would you expect anything less from me? lol!)
I just happen to be surfing the WWW for different ideas when I came upon this gal's beautiful rendition of Medusa. Her costume was to die for!
(What the?? "Scared to DEATH", "DEAD set", to "DIE for"... Lol!)
I had loved her costume so much that I had decided that I wanted to give it a whirl!
I just wanted something creepier, darker, and more Demon like.
I started the undertaking with this:

A simple food colander.
This was going to be the base of my headpiece.
Which turned into this:

A little flat black paint is all it needed!
It didn't matter if it wasn't the world's best paint job, nobody was going to see it anyway. I just needed it not to be green, and to not say "Tupperware"! LOL!
Next up- The Serpents were born!
I made primitive looking snakes by untwisting wire hangers and cutting them in half. Then, I used plastic shopping bags, wrapping the bags around a wire - to give the snake girth. Each snake wire required 3 shopping bags wrapped like a candy cane, keeping one end free of plastic in order to have a bit of wire to be able to attach it to the colander with. Next, I took blue painter's tape and wrapped the bag covered hangers. (Not to make it look snake sexy, just to keep the damn bags on!) After that, I took regular masking tape and wrapped neatly (er.. or "neater") to try and make them look smooth. I then bent the wires to resemble snakes and added more tape where needed. Finally, I took cheap black and grey spray paint and painted the snakes, finishing by adding red glitter glue for eyes. I went for a more blotchy, imperfect look with my paint to give it a more grisly appearance.
Sometimes "Imperfect" is perfect!
When dry, I started to wire them onto the colander.

I really liked the stiffness of the wire hangers. I could get them to stand up without worry of falling over. I continued to make more wire snakes, and continued adding them to the colander.

I would constantly put the colander on my head checking for balance, and visual appeal. I moved the snakes around as needed. I didn't want it to fall off my head because it was too weighty on one side!
(At this point it still unfortunately looks like a colander!)
Creating my Boa Constrictor:
Because all of my snakes were relatively the same diameter, I wanted to give it something larger to add dimension. Lucky for me, my local Goodwill store was having a clearance on Ladies Knee High Panty Hose! $.10 a pair! SCORE! (FYI- I felt stupid going through checkout with my $.25 worth of panty hose!) Once upon a life I was way more crafty than I am now and I just happened to have a large box of bulk quilt batting laying around. I began by stuffing the hosiery until it was approx. 4" in diameter, and 20" long. I then tied a knot in the open end. Because my hosiery was more brown than black I started out by spray painting it black first. Which because of the nature of the beast ended up being a dark shade of grey. To give it the final snake look I used a gauntlet glove (which was part of a past costume), stretched it over the snake, and spray painted the glove grey. After a few minutes, I peeled off the glove, leaving this beautiful snake pattern underneath.
I thought this turned out perfect! I was so pleased with the results.
After everything was dry, I wired it (using fine gauged jewelry making wire) onto the colander (hiding both ends of the hose under the brim of the headpiece - making it look like just a coil of a serpent's body)

The Little Snakes:

These lil poppers are just cheap, dollar store plastic kid's toys. They come in an array of bright colors! I painted them using a combination of black and grey spray paint. Some are painted all black, some all grey, some a combination of both. After they were dry, I took 3 snakes to a group and wired them (jewelers wire) together. For the final cosmetic touch, I sprayed some hair spray glitter that I had lying around onto the bunch.
I was happy with this look! I then used the groups of snakes to fill in (wire on) the void spaces on the colander.
 Almost done!
Continually checking for balance and symmetry.
(This thing was WIDE! I couldn't walk straight through a doorway anymore, I had to turn to the side!)
 (Picture of the back of it.)
I didn't add any large wired snakes poking out the back because I needed to be narrow enough to walk sideways through a doorway. If I put them out the back, I wouldn't be able to clear the doorway!
As a final touch on the piece, I wired in some "real" looking rubber snakes (black cobras, garter snake, and a misc. one that I have no clue what type!) that I had borrowed from a friend.
They really added a pop of realism!
NEXT PROJECT:
The Make-Up...

Let's see... Where to start???
I knew that this would be a huge undertaking for me because I've never used wax before. So I allotted 3.5 hours to get ready.
First up, my hair:

OK, before I get started, LET'S BACK THIS TRUCK UP!
You are probably wondering what the Hell on earth I am wearing!
Because I didn't have anything to put on that I was willing to get dirty with make-up, I decided to use the retro, thrift store find "house coat" that was to be part of my Regan costume.
(It's embarrassing enough to post close-up non make-up pictures of myself, AND wear something completely hideous on top of it! *crawls under rock* lol!)
Back to my hair...
I experimented with hiding my hair under the headpiece vs. leaving it down. Up made it really look like a bowl on my head with my hair hidden, so I had decided to leave it down and curl it in rings to give it an appearance of being snakes (yes, it was quite the stretch!)
Next came the eyebrows:

I did what's called "Blocking them out".
(the eyebrow on the right side of the screen is done)
The reason you do this is to not make them so prominent when the make-up is on, and to ensure you have eyebrows left after you rip off (liquid) latex.
How it works: Carefully apply Spirit glue, when tacky use a Popsicle stick or spatula to press the hair in a downward motion to make the bump of the eyebrow disappear. Then you apply wax over top- and repeat all the steps again.
Prosthetic WAX:
And this is where it got tricky!
As you saw in a previous picture, wax comes in a tub. It's very solid until heated. I used a Popsicle stick to scrape out a chunk, I then rolled out the desired shape with my lightly covered baby oil hands (You'll need it, it's very sticky!) The heat of my hands made the wax malleable enough to shape. Once I made two identical shapes (one for each side of my face). I prepped my face for application.
First, I used an astringent facial cleaner to ensure my face was free of natural oils. Next, I held the shape up to my face and traced around it so that I knew where to put the glue. I used pen for this because I knew I wouldn't see it under my dark make-up anyway. Then I applied Spirit glue to the inside of the tracing. I tapped the glue with my finger to activate it and make it tacky. Once tacky, I used a cotton ball to cover the glue in a fine "fluff". The reason for this is that it gives the wax something to "grab" onto when glued.

After it's stuck in place, the blending begins...

This step to put it frankly, SUCKED.
(This is the part that Life laughs in your face!)
Unless you are in your teens, your skin is not what it used to be. Every time I would smooth out the wax edges, my floppy skin would create a wrinkle. I wanted it blended perfectly (cause I'm retentive like that) but I had to make a choice; Not so smoothly blended? Or wrinkles?

Making TWO of something out of wax AND having them be identical in size and placement was almost impossible! I called this "Close enough"!
After I had the wax in place and smoothed out, I covered them in liquid latex. I did this to give a smoother transition to where it connects to my face, help hold it in place, and make it a little more durable in case I got bumped.
Before applying make-up, I changed into my costume (A dress that could only be put on by going over my head.) and put in my plano contacts. Typically contacts are done last, but because I don't wear contacts I tend to tear quite a bit with the initial insertion and I didn't want to ruin my make-up.
(I don't have any pictures of me actually applying the make-up because my hands were covered in black, and I was getting pressed for time!)

My face was done using a tube of greasy black lipstick. I wasn't liking the shine the lipstick gave it so I went over it with liquid matte black clown make-up. Once that liquid dried it started to give it a mottled almost cracked look (which I thought added to the look!) I used my black liquid gel eyeliner to color in the water line on my lower lids, and to paint the tiny crevices around my wax. I made my eyes stand out by adding a dark red creme color on the bottom lid and top lid. I then used a yellow creme in the corners of my eyes where they meet my nose.
I thought this looked AWESOME! It really gave my eyes a piercing effect!
To make the snake pattern on my face, I took that same gauntlet glove I had used for painting scales on the headpiece hosiery, held it up to my face in random places (remember: Imperfect is perfect!) and sprayed grey hairspray through it. My neck I sprayed with black hairspray, then applied the same snake pattern as my face.
Lastly, My Teeth
These are my real teeth. They are covered in Kryolan tooth paint that I had ordered off the net a few days prior. It is sold in 4 colors: Nicotine (brown), black, red, white. I used red and black for this costume.
Steps: Brush teeth, dry teeth, insert cotton under upper lip to keep lip off teeth, paint teeth, when dry, remove cotton.
I was loving the teeth!! I think it looked great! And stayed on perfectly!
It felt weird... felt like you had really dirty teeth!
FINAL LOOK:

Unfortunately, I don't have any before going out pictures (only the one you saw earlier without the snakes on my head). This picture was taken at 2 am after I've spent 6 hours in my costume. Overall, I felt everything held good. My teeth were still colored and it hadn't flaked off at all! If I could be retentive about anything, it would be the wax. You can see where it started to lift right at the corners of my eyes. It's because of me smiling all the time. (In hindsight, I should have smiled first before putting on the wax pieces.)

All in all, I thought it turned out well!
Between my 5'9" height, 2" heels, height of the snakes, I looked like a force to be reckoned with!
People loved my costume!
They asked to take my picture, and to have my picture taken with them. The most popular questions were how did I do my teeth, and how did I get the snakes to stand out.
The BEST question of the night came at the end...
A sincere man came up to me and apologized for asking, but he asked:
"Are you a MAN or a WOMAN?"
REALLY???

LOL!
I was going to end this there, but I wanted to add just one more thing...
REMOVAL!

3.5 hours to apply...
1.5 hours to remove!
(This picture cracks me up- I think I look creepier here than with the full make-up!)
HAPPY HALLOWEEN!
Which turned into this:

A little flat black paint is all it needed!
It didn't matter if it wasn't the world's best paint job, nobody was going to see it anyway. I just needed it not to be green, and to not say "Tupperware"! LOL!
Next up- The Serpents were born!
I made primitive looking snakes by untwisting wire hangers and cutting them in half. Then, I used plastic shopping bags, wrapping the bags around a wire - to give the snake girth. Each snake wire required 3 shopping bags wrapped like a candy cane, keeping one end free of plastic in order to have a bit of wire to be able to attach it to the colander with. Next, I took blue painter's tape and wrapped the bag covered hangers. (Not to make it look snake sexy, just to keep the damn bags on!) After that, I took regular masking tape and wrapped neatly (er.. or "neater") to try and make them look smooth. I then bent the wires to resemble snakes and added more tape where needed. Finally, I took cheap black and grey spray paint and painted the snakes, finishing by adding red glitter glue for eyes. I went for a more blotchy, imperfect look with my paint to give it a more grisly appearance.
Sometimes "Imperfect" is perfect!
When dry, I started to wire them onto the colander.

I really liked the stiffness of the wire hangers. I could get them to stand up without worry of falling over. I continued to make more wire snakes, and continued adding them to the colander.

I would constantly put the colander on my head checking for balance, and visual appeal. I moved the snakes around as needed. I didn't want it to fall off my head because it was too weighty on one side!
(At this point it still unfortunately looks like a colander!)
Creating my Boa Constrictor:
Because all of my snakes were relatively the same diameter, I wanted to give it something larger to add dimension. Lucky for me, my local Goodwill store was having a clearance on Ladies Knee High Panty Hose! $.10 a pair! SCORE! (FYI- I felt stupid going through checkout with my $.25 worth of panty hose!) Once upon a life I was way more crafty than I am now and I just happened to have a large box of bulk quilt batting laying around. I began by stuffing the hosiery until it was approx. 4" in diameter, and 20" long. I then tied a knot in the open end. Because my hosiery was more brown than black I started out by spray painting it black first. Which because of the nature of the beast ended up being a dark shade of grey. To give it the final snake look I used a gauntlet glove (which was part of a past costume), stretched it over the snake, and spray painted the glove grey. After a few minutes, I peeled off the glove, leaving this beautiful snake pattern underneath.
I thought this turned out perfect! I was so pleased with the results.
After everything was dry, I wired it (using fine gauged jewelry making wire) onto the colander (hiding both ends of the hose under the brim of the headpiece - making it look like just a coil of a serpent's body)

The Little Snakes:

These lil poppers are just cheap, dollar store plastic kid's toys. They come in an array of bright colors! I painted them using a combination of black and grey spray paint. Some are painted all black, some all grey, some a combination of both. After they were dry, I took 3 snakes to a group and wired them (jewelers wire) together. For the final cosmetic touch, I sprayed some hair spray glitter that I had lying around onto the bunch.
I was happy with this look! I then used the groups of snakes to fill in (wire on) the void spaces on the colander.

Continually checking for balance and symmetry.
(This thing was WIDE! I couldn't walk straight through a doorway anymore, I had to turn to the side!)

I didn't add any large wired snakes poking out the back because I needed to be narrow enough to walk sideways through a doorway. If I put them out the back, I wouldn't be able to clear the doorway!
As a final touch on the piece, I wired in some "real" looking rubber snakes (black cobras, garter snake, and a misc. one that I have no clue what type!) that I had borrowed from a friend.
They really added a pop of realism!
NEXT PROJECT:
The Make-Up...

Let's see... Where to start???
I knew that this would be a huge undertaking for me because I've never used wax before. So I allotted 3.5 hours to get ready.
First up, my hair:

OK, before I get started, LET'S BACK THIS TRUCK UP!
You are probably wondering what the Hell on earth I am wearing!
Because I didn't have anything to put on that I was willing to get dirty with make-up, I decided to use the retro, thrift store find "house coat" that was to be part of my Regan costume.
(It's embarrassing enough to post close-up non make-up pictures of myself, AND wear something completely hideous on top of it! *crawls under rock* lol!)
Back to my hair...
I experimented with hiding my hair under the headpiece vs. leaving it down. Up made it really look like a bowl on my head with my hair hidden, so I had decided to leave it down and curl it in rings to give it an appearance of being snakes (yes, it was quite the stretch!)
Next came the eyebrows:

I did what's called "Blocking them out".
(the eyebrow on the right side of the screen is done)
The reason you do this is to not make them so prominent when the make-up is on, and to ensure you have eyebrows left after you rip off (liquid) latex.
How it works: Carefully apply Spirit glue, when tacky use a Popsicle stick or spatula to press the hair in a downward motion to make the bump of the eyebrow disappear. Then you apply wax over top- and repeat all the steps again.
Prosthetic WAX:
And this is where it got tricky!
As you saw in a previous picture, wax comes in a tub. It's very solid until heated. I used a Popsicle stick to scrape out a chunk, I then rolled out the desired shape with my lightly covered baby oil hands (You'll need it, it's very sticky!) The heat of my hands made the wax malleable enough to shape. Once I made two identical shapes (one for each side of my face). I prepped my face for application.
First, I used an astringent facial cleaner to ensure my face was free of natural oils. Next, I held the shape up to my face and traced around it so that I knew where to put the glue. I used pen for this because I knew I wouldn't see it under my dark make-up anyway. Then I applied Spirit glue to the inside of the tracing. I tapped the glue with my finger to activate it and make it tacky. Once tacky, I used a cotton ball to cover the glue in a fine "fluff". The reason for this is that it gives the wax something to "grab" onto when glued.

After it's stuck in place, the blending begins...

This step to put it frankly, SUCKED.
(This is the part that Life laughs in your face!)
Unless you are in your teens, your skin is not what it used to be. Every time I would smooth out the wax edges, my floppy skin would create a wrinkle. I wanted it blended perfectly (cause I'm retentive like that) but I had to make a choice; Not so smoothly blended? Or wrinkles?

Making TWO of something out of wax AND having them be identical in size and placement was almost impossible! I called this "Close enough"!
After I had the wax in place and smoothed out, I covered them in liquid latex. I did this to give a smoother transition to where it connects to my face, help hold it in place, and make it a little more durable in case I got bumped.
Before applying make-up, I changed into my costume (A dress that could only be put on by going over my head.) and put in my plano contacts. Typically contacts are done last, but because I don't wear contacts I tend to tear quite a bit with the initial insertion and I didn't want to ruin my make-up.
(I don't have any pictures of me actually applying the make-up because my hands were covered in black, and I was getting pressed for time!)

My face was done using a tube of greasy black lipstick. I wasn't liking the shine the lipstick gave it so I went over it with liquid matte black clown make-up. Once that liquid dried it started to give it a mottled almost cracked look (which I thought added to the look!) I used my black liquid gel eyeliner to color in the water line on my lower lids, and to paint the tiny crevices around my wax. I made my eyes stand out by adding a dark red creme color on the bottom lid and top lid. I then used a yellow creme in the corners of my eyes where they meet my nose.
I thought this looked AWESOME! It really gave my eyes a piercing effect!
To make the snake pattern on my face, I took that same gauntlet glove I had used for painting scales on the headpiece hosiery, held it up to my face in random places (remember: Imperfect is perfect!) and sprayed grey hairspray through it. My neck I sprayed with black hairspray, then applied the same snake pattern as my face.
Lastly, My Teeth
These are my real teeth. They are covered in Kryolan tooth paint that I had ordered off the net a few days prior. It is sold in 4 colors: Nicotine (brown), black, red, white. I used red and black for this costume.
Steps: Brush teeth, dry teeth, insert cotton under upper lip to keep lip off teeth, paint teeth, when dry, remove cotton.
I was loving the teeth!! I think it looked great! And stayed on perfectly!
It felt weird... felt like you had really dirty teeth!
FINAL LOOK:

Unfortunately, I don't have any before going out pictures (only the one you saw earlier without the snakes on my head). This picture was taken at 2 am after I've spent 6 hours in my costume. Overall, I felt everything held good. My teeth were still colored and it hadn't flaked off at all! If I could be retentive about anything, it would be the wax. You can see where it started to lift right at the corners of my eyes. It's because of me smiling all the time. (In hindsight, I should have smiled first before putting on the wax pieces.)

All in all, I thought it turned out well!
Between my 5'9" height, 2" heels, height of the snakes, I looked like a force to be reckoned with!
People loved my costume!
They asked to take my picture, and to have my picture taken with them. The most popular questions were how did I do my teeth, and how did I get the snakes to stand out.
The BEST question of the night came at the end...
A sincere man came up to me and apologized for asking, but he asked:
"Are you a MAN or a WOMAN?"
REALLY???

LOL!
I was going to end this there, but I wanted to add just one more thing...
REMOVAL!

3.5 hours to apply...
1.5 hours to remove!
(This picture cracks me up- I think I look creepier here than with the full make-up!)
HAPPY HALLOWEEN!
Wednesday, October 9, 2013

Subscribe to:
Posts (Atom)